Saltwater aquariums are a great way to add a touch of the ocean to your home. They are more challenging to set up and maintain than freshwater aquariums, but they can be more rewarding.
This blog post will walk you through the steps involved in setting up a saltwater aquarium.
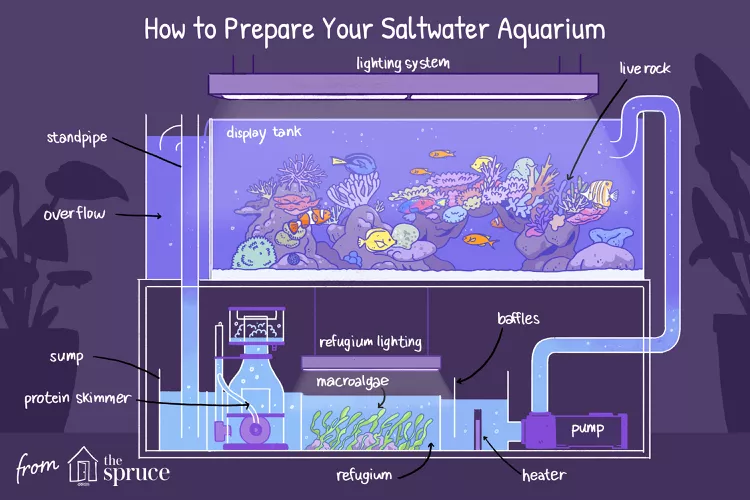
Preparing Your Aquarium
The first step is to choose a size and type of aquarium. Saltwater aquariums can be small or large, and they can be either fish-only or reef tanks. Fish-only tanks are simpler to set up and maintain, while reef tanks are more complex.
Image From The Spruce Pets – The Spruce / Joshua Seong
Once you have chosen your aquarium, you need to prepare it. This involves cleaning the tank and adding substrate. You will also need to install a filtration system and lighting.
Installing the Sump Equipment
A sump is a separate tank that is used to house the filtration system for your saltwater aquarium. It is important to choose a sump that is the right size for your aquarium.
Running a Wet Test
Once your sump is installed, you need to run a wet test. This involves filling the aquarium and sump with water and checking for leaks.
Adding Substrate and Sea Salts
After you have run a wet test, you can add substrate and sea salts to your aquarium. Substrate is a material that is used to cover the bottom of the tank. Sea salts are used to create the correct salinity level in the water.
Situating the Rock and Aquascaping
Once you have added substrate and sea salts, you can situate the rock and aquascape your aquarium. Aquascaping is the process of arranging rocks and other decorations in your aquarium.
Installing the Lighting System
Saltwater aquariums require special lighting. The type of lighting you need will depend on the type of fish and coral you want to keep.
Adding Livestock and Cycling the Tank
Once your aquarium is set up, you can add livestock. It is important to add livestock slowly and to cycle the tank before adding any fish. Cycling a tank involves allowing the beneficial bacteria to grow in the aquarium.
Maintaining Your Saltwater Aquarium
Once your aquarium is set up, it is important to maintain it. This involves monitoring water quality, cleaning the mechanical filter, and adding new fish slowly.
Tips for Beginners
Here are a few tips for beginners:
Start with a small aquarium.
Do your research.
Be patient.
Don’t be afraid to ask for help.
I hope this blog post has been helpful. If you have any questions, please feel free to leave a comment below.
The Freshwater Angelfish (Pterophyllum scalare) belongs to the Cichlidae family. This family includes all species of freshwater Cichlids.
It should not be confused with the Marine Angelfish, which belongs to the Pomacanthidae family.
These fish are one of the many unique species that come from Brazil’s Amazon River. They are found in the river basin and its tributaries in Peru, Colombia, and Guiana.
They are one of the most popular freshwater Cichlid choices due to their fancy appearance, ease of care, and lack of aggression compared to other Cichlid species.
In well-kept tanks, these fish can live up to 10 years. They reach maturity at around 10 months of age.
Since they are so popular, you can find them at most aquarium suppliers and pet shops.
On average they will cost around $10 – specialty breeds will cost between $20 and $40, depending on the variety and the quality.
Typical Behavior
Like most Cichlids, they can be quite aggressive. They will form small hierarchies and fight to defend their positions. If you catch your angels’ locking lips, they are actually fighting.
They will form small schools but are not particularly social with the others in their school. They are quite territorial and are more likely to fight than cooperate.
However, they are not as aggressive as other Cichlids. They are not likely to bully others outside of their school.
You can watch them as they weave in and out of your aquarium plants in the middle level of your tank. Although they might hide in an overcrowded tank, they are otherwise very showy fish.
These fish are one of the few species that take care of their young. They will fiercely defend their eggs and rear the newly-hatched larvae and fry for up to two months.
Outside of competition and mating, they will not interact much with each other. You should not expect to see coordinated swimming patterns and cooperative foraging.
Types and Appearance
Angelfish can grow up to 6 inches long, and their spectacular fins can reach heights of up to 8 inches tall.
They are shaped like arrowheads, with wide bodies and triangular snouts. Their most iconic feature is their trailing dorsal and pectoral fins and their wide fan-shaped caudal fin.
Usually, Freshwater Angelfish are silver with 4 large, black bands. Juveniles have 7 bands but as they mature their bands reduce to 4.
Standard color forms include gold, silver, black and marbled. Marbled Angelfish have black spots or jagged, irregular bands rather than the typical straight black bands.
In addition to the standard colors, specialty colors and patterns are bred for ornamental purposes – some are even bred to resemble Goldfish or Koi!
The Koi variety is silver or white, with orange/red spots and a black marbled pattern that resembles a typical Kohaku Koi fish.
Gold and Platinum Angelfish are completely gold or completely silver, with no banded pattern.
There is even a color form that resembles a panda. Panda Angelfish have stark white scales with an all-over spotty black pattern.
Habitat and Tank Conditions
This species is native to the Amazon River and its tributaries – it is found in slow-moving streams, swamps, and floodplains along the Amazon River basin.
These are tropical fish that thrive in warm water with temperatures between 75-82°F. Their water is often acidic, with little to no salinity.
They live in swampy conditions, with a fine sandy substrate and lots of aquatic vegetation and mosses for hiding.
Their water is usually clear and they live at depths where light can easily penetrate the water and reach them.
Tank Setup
This Cichlid tank should be kept between 75 and 82°F. The pH should be anywhere from 6.8 to 7.
Cichlids like to dig, so any substrate you place in the tank should be soft and fine. This will prevent cuts and scrapes to their scales and fins. Fine sand/mud will make the best substrate for them.
Freshwater Angelfish are used to very small amounts of flow, so there is no need to generate a powerful current – you should use low flow aeration or an under-gravel filter.
The tank will need exposure to 8 to 12 hours of light per day. Any aquarium light that can mimic the sun will do just fine.
To create a miniature swamp that mirrors your Angel’s tropical swampland, you can use plants that are native to the Amazon River.
Amazon Sword plants have wide, broad leaves that make a safe and comfortable place for your fish to a hideout.
Brazilian Waterweed, more commonly known as Anacharis, is another good choice for an Angel tank. Outside of native South American plants, you can include Java Fern and Java Moss.
Avoid using floating vegetation like Duckweed and Pondweed. These can overcrowd your tank and block out light.
What Size Tank Do Freshwater Angelfish Need?
You will need a minimum of 20 gallons to keep a pair of Freshwater Angelfish. You will need at least 80 gallons to keep a small school.
You will need at least 10 gallons for every Freshwater Angelfish in the tank.
Tank Mates
The Amazon River basin that this fish calls home is a biodiversity hotspot. In the wild, these fish live alongside thousands of unique fish species.
The slow-moving streams and swamps of the Amazon are dominated by other species of Freshwater Angelfish, and other Cichlids such as Oscars, Discus, and Banded Cichlids.
They live with Characins, small freshwater Catfish, and the more infamous Amazon River species such as the Silver Arowana and the mighty Arapaima.
Though they come from an area well known for their species richness, selecting compatible tank mates for these little guys can be quite difficult.
If keeping them with other Cichlids, choose species like the discus, dwarf cichlid, and Bolivian ram. These species will not be easily bullied by your Angelfish.
They might even be able to handle sharing a tank with Jack Dempseys, though these are known for being very pushy.
Outside of other Cichlids, Mollies and dwarf gouramis make ideal companions for your Angels. Small freshwater Catfish, particularly plecos and pictus are another good choice.
There are not very many good non-fish companions for these cichlids. Crustaceans and other invertebrates risk being harassed or preyed on.
Avoid keeping South American and African cichlids together. These cichlids are from entirely different parts of the world and require different environmental conditions and water parameters.
Do not mix too many Angelfish species together, or they will behave aggressively towards one another in competition for territory and resources.
Do not keep any of the more aggressive Cichlids, such as Oscars and Convicts, with these fish.
Barbs should be avoided due to their reputation as ‘fin-nippers’. These pushy fish will harass your Freshwater Angelfish and bite at their trailing fins.
Keeping Freshwater Angelfish Together
A single species tank is the best way to keep this Cichlid species. They can be kept in schools of about 5 or 6 individuals.
They will form territories and hierarchies within their school and their competition for dominance can be very engaging.
Care
Angelfish have known carriers of parasitic nematodes. Infection by these nematodes can be fatal and can spread to the other fish in your aquarium.
Infection is caused by them eating nematode’s eggs or larvae, which can be found on unclean food and in dirty tanks.
Once the larvae are eaten, there is a three-month infection period as the worm goes through its life cycle. The worm will steal nutrition from its host, making the fish appear weak over time.
Infected fish may display inflammation, cysts, or bleeding. If you notice these symptoms in your fish, it’s important to separate them from the tank as quickly as possible.
The parasite can be treated with a dewormer administered by a veterinarian that specializes in aquarium fish.
Hexamita is another parasite that affects Cichlids. It is caused by the ingestion of a protozoan that infects the fish’s intestines and gallbladder.
The symptoms of a Hexamita infection include:
weight loss
sluggishness
paleness
discoloration
It can be treated with medicine administered by a fish veterinarian.
To prevent parasitic infections make sure that you are clean your tank at least once a fortnight, or more in particularly messy or smaller tanks.
Make sure that you are carefully inspecting the food you give to your fish. Never give them wild-caught prey.
Any new fish that you plan to place in your community tank should be quarantined for 2 to 4 weeks to make sure they are healthy.
Diet
Angelfish are omnivores, but small live prey makes up the majority of their diet. In the wild, they feast on insects, larvae, crustaceans, rotifers and even smaller fish.
They require a diet high in protein and fiber and do not eat lots of plant material or algae.
In the aquarium, they should get the majority of their nutrition from live prey (just like in the wild).
Tubifex worms are a vital food source for these fish in the aquarium. They provide the protein content that they would be getting from wild rotifers.
You can also give them live water fleas and brine shrimp. Outside of living prey, they can be given flake or pellet foods that are high in protein.
Freeze-dried glass worms and krill provide a little bit of extra protein and satisfy an Angelfish’s appetite.
These are big feeders that must be fed at least twice a day. Mated pairs that you are planning to breed must be fed, even more, up to 4 times a day.
They do not eat aquarium plants or algae. However, adding a little bit of plant food to their diet will help make sure that they get the fiber they need.
You can supplement their diets with cooked garden vegetables, including romaine, zucchini, and spinach.
The vegetables should be lightly blanched before you give them to your fish.
Breeding
One of the reasons these fish are so popular is that they are very easy to breed!
When introduced to a school, Freshwater Angelfish will pair off naturally. Once paired, they will set aside territory for themselves and their mate.
When you see that your fish are paired off, you can prepare them for breeding.
Create a breeding environment using a 20-gallon tank with a low flow filter and a vertical, slanted surface. Tiles, PVC pipes, and Anacharis all make good spawning surfaces.
Your breeding pair should be fed high protein flakes and live tubifex worms up to 4 times a day. The temperature of the breeding tank should be maintained at 82°F.
If you see your female spending a lot of time near the spawning surface, she is preparing to lay her eggs. She will lay anywhere between 200 and 400 eggs per spawning, and the male will fertilize them externally.
The parents will rear the eggs and fry for about a month before the fry can be separated and placed in a 15-20 gallon rearing tank.
Your fry should be fed brine shrimp larvae with hardboiled eggs mixed with water until they are 5 to 7 weeks old. After this, they can be fed flakes and dried foods.
After 6 to 8 weeks in the rearing tank, your Freshwater Angelfish should be ready to graduate to an adult tank.
Are Freshwater Angelfish Suitable For Your Aquarium?
With their exotic beauty, it’s easy to see why the ‘King of the Aquarium’ is so well-loved.
They will shine in a tropical community tank just as well as they will stand out on their own. With a wide range of colors and varieties to choose from, they will fit into any tank.
If you are thinking of keeping a few of these beauties, it helps if you already have experience keeping tropical freshwater fish.
In comparison to the other more difficult Cichlids, they are quite beginner-friendly.
If you want all of the grace and majesty of an Angelfish, but don’t feel quite ready for a saltwater tank, the Freshwater Angelfish might just be a perfect choice.
One of the more frustrating parts of the aquarium hobby is trying to catch or move your fish. Just try chasing around fast and slippery fish using a flimsy net with a ton of aquarium decorations in the way. After years of running an aquarium fish store, we have caught thousands and thousands of fish, so we know a thing or two about trying to wrangle the exact number, type, or color of fish for our customers. Learn about our favorite technique for netting fish that not only saves time but also saves your fish from getting stressed out.
Before You Get Started…
Not all aquarium nets are created equal, so make sure you start off with the right tool for the job. Check the net for any holes or rips that would allow the animals to slip out. Select a larger net that covers more surface area and makes it easier to capture your target. Also, consider what kind of fish you are trying to catch. Use a net with a fine mesh when handling baby fry and shrimp to prevent escape. However, if you are chasing faster or smarter fish (like African cichlids, loaches, and rainbowfish), get an aquarium net with coarse mesh or tiny holes because it decreases drag through the water and allows you to move more quickly when needed.
Aquarium Co-Op fish nets are designed with coarse mesh for reduced water drag, strong carbon fiber handles that won’t flex, and no metal parts to eliminate rusting.
The Easiest Way to Catch Fish with Aquarium Net
Now that you have the right net for the job, let’s talk about the proper technique. Remember to remain cool, calm, and collected because when you become overly agitated, your movements convey your anxiety and the fish are more likely to become stressed as well.
Try not to stand above or tower over the fish tank because some fish may view you as a predator and become frightened even before you get started. If the tank is low to the ground, get a stool that allows you to sit down at their level.
Hold the net closer to the net rim and not at the very end of the handle. This position gives you more control to make faster movements.
Set a trap so that the net is facing one of the front corners of the tank.
In this example, we are using the left corner, so place the net at an angle such that the right edge of the net is flush against the glass and the bottom edge of the net is tight against the ground.
This arrangement leaves an opening on the left edge of the net so that the fish can easily swim inside.
You can also utilize large pieces of fish tank decorations (instead of the tank walls) to set your trap if that’s easier.
the net on the ground and keep the right side of the net tight against the tank wall. The only way fish can enter is from the left side of the net.
Because a fish net tends to be slower than your hand, the key is to use one of your hands to “chase” the fish into the trap while the net stays mostly fixed in place.
Place your hand in the water (with fingers stretched open to look larger) and sweep the fish from the right to left side of the aquarium.
At the end of the sweep, move your hand towards the front left corner of the tank so that the fish enter the net.
If you have a taller aquarium, your hand also has to stay higher in the water to prevent the fish from escaping over the top edge of the net.
While one hand holds the net handle, use the other hand to go behind the net and sweep the fish from the right to left side of the tank. Once the fish reach the left wall of the aquarium, push your hand towards the front left corner so that they naturally swim away from you and enter the net.
As soon as the fish enter the net, swing the trap shut so that the left edge of the net is also flat against the front glass.
Once the desired fish are in the net, close the trap so that the net rim is entirely flush against the front wall of the aquarium.
Keep the desired fish in the net while letting the unwanted fish swim out of the net.
Move the desired fish deeper into the net. Place your hand against the glass to cause the desired fish to swim further into the mesh. Gently shuffle the net from side to side if needed to keep them tucked away.
Lift the net rim slightly away from the glass (in a corner of the net that is furthest away from the desired fish) so that you can release the unwanted fish.
If all of the fish (including the unwanted ones) keep swimming deeper into the net, you can use your hand or finger to push or chase out the unwanted fish.
In this case, we want to keep the powder blue dwarf gourami but release the red platy. Therefore, we slightly opened the right side of the net and used our hand to gently guide the platy out.
Lift the net out of the water, while keeping the net rim flat against the glass for as long as possible.
Don’t rotate the net horizontally before bringing the fish out of the water because it causes them to panic and increases the likelihood that they will jump out.
Instead, pull the net straight up vertically and quickly out of the water. This causes the mesh to drop down and naturally trap the fish in the net.
The more times you lift the net in and out of the water, the more scared the fish may become, which in turn makes them harder to catch.
Slide the fish net vertically out of the water so that it remains flush against the tank wall for as long as possible. This method causes the net mesh to drop downwards, trapping the fish in the net and minimizing their chances of escape.
Swordtail fish Livebearers are a popular group of freshwater fish. They are hardy and easy to care for, making them a great choice for beginners.
Some of the most popular are Swordtails.
This American species is an active and peaceful member of community aquariums, best known for their unique attractive tail.
To help you keep Swordtails, below we will explain their ideal setups, perfect tank mates, breeding techniques and much more…
Category
Rating
Care Level:
Easy
Temperament:
Peaceful
Color Form:
Various
Lifespan:
Up to 5 years
Size:
Up to 6.5″
Diet:
Omnivorous
Family:
Poeciliidae
Minimum Tank Size:
15 Gallons
Tank Set-Up:
Freshwater with plants and swimming space
Compatible:
Peaceful community
Overview
Swordtails (Xiphophorus helleri) are a freshwater species in the Poeciliidae family.
They are native to North and Central America, ranging from Mexico to Honduras. Here they live in rivers and streams with lots of plants. They are also known to tolerate brackish waters, so can be kept in low salinities.
These fish are livebearers, which mean they retain their eggs inside their body and give birth to live young.
They are closely related to the Southern Platy (a fellow livebearer) and can even crossbreed with them. This crossbreeding has produced many varieties of aquarium fish.
Swordtails are a commonly sold species, so you will likely find them in your local fish store.
Once in your aquarium they can live for up to 5 years – the healthiest tanks have the best chance for individuals to live the longest.
Typical Behavior
This is a peaceful species that works well in a community of other small peaceful fish. They can be kept in a species only tank too.
They live in groups, but they are not shoaling fish. Males might show aggression towards each other, so make sure they are outnumbered by females in a ratio of 4 to 1.
Swordtails can become timid when kept with boisterous fish, hiding away amongst the plants and decorations.
They occupy the middle and upper levels of the tank, rarely exploring down to the bottom. If given enough swimming space, they will be very active members of your aquarium.
Swordtail Fish Appearance
The first thing you will notice is their caudal fin.
These fish are known for having an elongated lower lobe on their tail – this extension looks like a sword, hence their name.
Only males have this though, so it’s easy to distinguish between the sexes.
Wild populations are an olive green color with a reddish-brown lateral stripe along the length of the body. A male’s sword is yellow with black edges.
However, these days due to extensive captive breeding, you can find them in most colors. Reds, oranges and blacks are a couple of the most common variants. Their colors will intensify when kept stress-free in a healthy environment.
Males reach 5.5 inches, but females could be up to an inch larger.
Habitat and Tank Conditions
This freshwater species naturally live in rivers and streams in North and Central America. Here they would be surrounded by tropical flowing water.
There would be plenty of vegetation planted among rocks and debris. The plants provide shelter from other fish, the flowing water and sunlight. Sometimes these fish are found in brackish habitats, but this is rare and will lower their life expectancy in an aquarium.
Swordtails are hardy creatures, but they need to be kept in an environment that matches their natural tropical freshwater habitat.
Tank Setup
The substrate is not your biggest concern since Swordtails rarely venture to the bottom of the tank. Use sandy substrates if you want to replicate their habitat as closely as possible.
Rocks and bogwood create a natural feel to your tank – they also make some useful caves and crevices too.
Plants are an important addition, as these fish need to hide when they are feeling stressed. Spread them around the tank, but make sure to leave lots of swimming space.
There are so many plants to choose from. Anubias Nana, Java Fern, and Dwarf Hairgrass are some great options.
As for the water conditions:
pH needs to be maintained at 7-8.4
Hardness should be 12-30 dGH
Temperature should be between 70-82°F
Changes in these water conditions could cause health problems, so manage and maintain them.
Though they live in flowing water, you don’t need to use a pump to move the water around your tank – the filter outlet should produce enough current.
What Size Aquarium Do They Need?
Although these fish are not big, they are active and need plenty of swimming space.
A single swordtail needs at least 15 gallons.
As they prefer being in groups, each additional fish needs roughly 5-6 gallons of water to keep them comfortable.
Tank Mates
Peaceful, active fish such as Swordtails pair well with other similar species. They are social fish that will enjoy the company of other passive tank mates.
This is seen in the wild where they live alongside Platies, their close relatives.
You will easily find other suitable species, the hardest part is choosing between them. You could mix them with Mollies, Rosy Barbs, Neon Tetras, Dwarf Gourami, Pearl Danio, or Angelfish in the mid-levels of the tank.
Dwarf Corydoras, Kuhli Loaches, Otocinclus, and Zebra Loaches are good options for adding some activity to the lower levels.
You should avoid aggressive species that can attack and injure your swordtails. This rules out most Cichlids like Jack Dempseys or Convict Cichlids. They would not come across any predatory fish in the wild.
To mix in some different behaviors, try adding some invertebrates. Ghost Shrimp or Apple Snails are some interesting tank mates that are often overlooked.
Keeping Swordtail Fish Together
Swordtails won’t shoal, but they are social and enjoy being in a group of their own kind.
Males usually display aggression towards each other, so in smaller tanks (15 gallons) only keep one male.
A bigger tank (30+ gallons) can hold more males – make sure to keep a ratio of one male for every four females.
What To Feed Them
Your Swordtails will eat virtually anything, so it’s easy to design a suitable diet.
In the wild their omnivorous diet would include insect larvae, algae and other vegetation.
You can give them high-quality dried foods to supply a range of nutrients.
However, as juveniles they need lots of protein. This means that live or frozen foods like bloodworms, daphnia and brine shrimp are important supplementary items to a dried food diet.
Make sure that they receive some vegetation too (this will provide some fiber to ease their digestion). Algae wafers can be a good way to do this, but you can also add in some green vegetables that you might already have at home.
Feed your swordtails 2-3 times a day. They don’t need much food, just what they will finish within a couple of minutes. Remove any food that is left over so that it does not get broken down and pollute the water.
If you keep a regular routine, they will soon learn when to expect food and become much more active at feeding times.
Swordtail fish is good to keep.
Swordtail Fish Care Guide
The good news is this fish is simple to care for. Swordtails are hardy and can survive beginner mistakes.
Firstly you need to keep them in a healthy aquarium. Check the water parameters each week so that any changes can be sorted quickly. A drop in water temperature can lower a fish’s immune system, leaving them susceptible to disease.
A poor diet is another factor that can lead to disease, so make sure you provide a varied diet containing a range of nutrients.
They are generally peaceful, so you don’t need to worry about fighting and injuries.
Since most livebearers are hardy, they are not prone to disease, but they are not completely immune either. If you notice signs of disease, isolate the infected fish in a quarantine tank to prevent it spreading to the rest of your fish.
Ich (or white spot disease) is a common issue caused by an ectoparasite. It results in white spots across the body or fins. To treat it, raise the temperature to 82°F and add 1 teaspoon of salt per every 2 gallons of water.
Another potential disease is mouth fungus, also known as cottonmouth because it causes fluffy growths around the mouth and fins. This can be treated with antibiotics purchased from a pet store.
Swordtails are livebearers which means they give birth to live young after the eggs have developed in the female’s body.
There are a few things you can do to encourage them to breed.
Gradually increase the water temperature to 80-82°F.
Keep the tank as clean as possible.
Provide them a healthy diet that provides a range of nutrients, especially proteins.
Once ready the males will swim alongside the females, occasionally nipping them. This can stress the females, so there needs to be more females in the tank than males.
Interestingly, there is evidence to suggest that females prefer males with a larger ‘sword’.
Once the female is pregnant, her belly will swell with a dark gravid spot by the anal fin.
Separate the fry into a breeding tank once they emerge or the parents might eat them.
The fry will be too small to eat adult’s feed, so crush up some flakes or purchase some specialized foods.
Are Swordtail Fish Suitable For Your Aquarium? (Summary)
If your aquarium includes a selection of peaceful freshwater fish, Swordtails will probably be a great addition. They get on well with other species but will quickly become stressed with aggressive tank mates.
By keeping the tank clean and maintaining their preferred conditions, you should not have many problems.
You might end up with more fish than you intended though, because these livebearers breed frequently.
This colorful fish is perfect for beginners and should lead to a successful start for your fishkeeping hobby.
Looking for a way to take your betta fish tank to the next level? Give live aquarium plants a try. Not only do aquatic plants help purify the water from your fish’s waste, but they also provide a beautiful, natural environment for your betta. In the wild, Betta splendens are commonly found in tropical marshes and rice paddy fields chock-full of thick vegetation. Therefore, aquarium plants serve as excellent enrichment for your betta to explore, obstacles to block line of sight in case he gets territorial, and resting places for him to sleep at night. Rest assured, most of the plants in our top 10 list are beginner-friendly species that only need low lighting and a comprehensive liquid fertilizer like Easy Green.
1. Java Fern
Java fern is one of the most well-liked plants in the aquarium hobby because of its long, thick leaves and low maintenance care. This slow-growing plant comes in several variations, like needle leaf, trident, and Windelov (or lace) java fern. It has a thick, horizontal “stem” called a rhizome that produces leaves on top and roots on bottom. Rhizome plants are special because they don’t need any substrate or gravel to grow; simply attach them to a rock or driftwood using super glue gel and place it wherever you like in the aquarium.
Java ferns also have an interesting way of reproducing. You can either cut the rhizome in half to split the plant into two, or your java fern may start popping out little plantlets directly from their leaves. Wait till a plantet is bigger and has a good amount of roots before detaching it and replanting it elsewhere in the tank. For more information about java fern care,
Java fern (Microsorum pteropus)
2. Anubias
The Anubias genus is another group of rhizome plants that comes in all sorts of shapes, sizes, and textures. Some of the most popular variants include Anubias barteri, anubias nana petite, and anubias coffeefolia. As with java fern, they can be attached to various hardscape and aquarium ornaments. Rhizome plants can be planted into the substrate as well, but be careful not to bury the rhizome or else the plant may die.
Anubias plants do not require substrate and instead are commonly attached to driftwood and rocks.
You can also simply drop the anubias with its plastic pot inside an Easy Planter decoration. The fake rock has a very natural appearance and is easy to move around if you want to change the look of your betta fish tank.
Place your anubias or java fern inside an Easy Planter as an attractive “pot” that can be moved around the aquarium whenever you like.
3. Marimo Moss Ball
If java fern and anubias sound intimidating, then you can’t go wrong with marimo moss balls, the world’s easiest aquarium “plant.” Despite the name, these fuzzy green orbs of velvet are neither a moss nor plant, but rather a type of algae. Their unusual round shape comes from being constantly rolled around the bottom of lakes. To “plant” them, just drop them anywhere in the aquarium that gets low amounts of light. They’re quite inexpensive and unique looking, so many people like to buy an army of marimo moss balls to fill their betta fish aquariums. To learn more, see our marimo moss ball care guide.
Marimo moss balls (Aegagropila linnaei)
4. Cryptocoryne
Cryptocoryne plants, or “crypts” for short, are known for their undemanding care and ability to live in low to high light conditions. One of the most common types, Cryptocoryne wendtii, comes in many varieties, such as green, bronze, tropica, and red. Betta fish can often be found resting on top or below their broad, wavy-edged leaves. Cryptocoryne parva, on the other hand, is one of the smallest crypts with deep green, slender leaves and is often used as a slow-growing, foreground plant.
Unlike most of the other plants on this list, cryptocorynes prefer to consume their nutrients from the ground rather than the water column, so they like to be planted in substrate that contains nutrients like root tab fertilizers. Also, if you see your new cryptocoryne plant wilting soon after purchase, don’t throw it away because it is likely experiencing “crypt melt.” Just leave it in the aquarium, and it will soon recover and start growing new leaves that are used to living in your water conditions.
Cryptocoryne wendtii
5. Water Sprite
This easy-to-grow stem plant is fairly versatile because you can plant it in the substrate or use it as a floating plant. Its fine, lacy leaves provide a dense jungle for your betta fish to investigate and use for building bubble nests. As a fast-growing species, water sprite does a great job of absorbing toxic nitrogen compounds produced by fish waste. If it ends up consuming all the nutrients from the water, use some Easy Green fertilizer to keep it well-fed.
Water sprite (Ceratopteris thalictroides)
6. Betta Bulb
You may see “betta bulbs” sold at big chain pet stores and wonder what exactly they are. Most of the time, you’re getting some kind of Aponogeton plant, which usually grows long, light green leaves with a rippled or wavy texture. Other easy bulb plants include the banana plant (with its banana-like tubers at the bottom) and dwarf aquarium lily (which produces reddish-bronze, triangular leaves). Both of these plants will send out lily pads that reach the surface, forming a network of stems for your betta to swim in between.
Banana plant (Nymphoides aquatica)
7. Sword Plant
For large aquariums, consider filling your tank with a massive sword plant, like an Amazon sword or red flame sword. This classic aquarium favorite is loved for its easy care requirements and big, broad leaves that provide resting and hiding spots for aquatic animals. As with crypts, this is another group of plants that feeds heavily from its roots and requires either nutrient-rich substrate or a frequent diet of root tabs to stay healthy. When the sword plant becomes large enough, it may start growing long spikes that turn into baby sword plants for you to propagate in other fish tanks.
Amazon sword (Echinodorus bleheri)
8. Vallisneria
If you wanted to create a thick underwater forest but only had money for one plant, vallisneria (or val) is your winning ticket. This tall, grass-like aquatic plant is very hardy and thrives in a wide range of environments. Plus, once it gets well-established in your aquarium, it spreads like wildfire by sending out new runners with baby plants every few days. Pick this plant as an easy way to fill the back of your aquarium and create natural line-of-sight barriers for your territorial betta. Read more in our vallisneria care guide.
Vallisneria spiralis
9. Pogostemon stellatus ‘Octopus’
This unique stem plant is another great background plant that can quickly cover your betta fish tank with tons of greenery. The ‘octopus’ nickname comes from the fact that each node on the stem produces several long and wispy leaves that look like octopus legs waving in the water current. As with most stem plants, it can grow quite tall in a short amount of time. For propagation, simply trim off the top half of the plant and replant it in the substrate. The plant cutting will develop new roots and leaves in no time, becoming a beautiful jungle gym for your betta to play in.
Pogostemon stellatus ‘octopus’
10. Floating Plants
Because betta fish like to hang out near the water surface, floating plants are a wonderful way to enhance the upper layers of their home. Popular types include Amazon frogbit, red root floaters, and even floating stem plants (like the aforementioned water sprite). Because of the fluffy roots and dense foliage, your betta feels safe enough to build his bubble nest or take a little nap surrounded by plant life. Just make sure to leave about 50% (or more) of the water surface clear of leaves so that there is room for adequate gas exchange at the surface (to introduce more oxygen into the water) and for your betta fish to take a gulp of air if needed.
Floating plants like Amazon frogbit are great anchor points for your betta fish to build bubble nests to his heart’s content.
நீங்கள் சாம்பியன்-தரமான இறால்களை இனப்பெருக்கம் செய்ய முயற்சிக்கவில்லை என்றால், நன்னீர் இறால்களுக்கு உணவளிக்க “சிறந்த” உணவைக் கண்டுபிடிப்பது நீங்கள் நினைப்பது போல் கடினமானது அல்ல. அலங்கார இறால் இப்போது மிகவும் பிரபலமாக உள்ளது என்பதை மீன் நிறுவனங்கள் அறிந்திருக்கின்றன, எனவே இறால் மிகவும் சிறப்புத் தேவைகளைக் கொண்டிருப்பதை அவர்கள் நம்ப வைக்க அவர்கள் நிறைய மார்க்கெட்டிங் டாலர்களைச் செலவிடுகிறார்கள், அவற்றின் இறால் உணவின் பிராண்ட் மட்டுமே பூர்த்தி செய்ய முடியும். உண்மையில், குள்ள இறால் உணவுச் சங்கிலியில் கடைசியாக உள்ளது, அவை அழுகும் தாவரங்கள், இறந்த விலங்குகள், ஆல்காக்கள் மற்றும் நுண்ணுயிரிகள் நிறைந்த பயோஃபில்ம் சாக் ஆகியவற்றை உண்ணும் தோட்டிகளாக செயல்படுகின்றன. அவற்றின் உணவில் புரதங்கள் மற்றும் காய்கறி பொருட்கள் இரண்டுமே உள்ளன, எனவே அத்தியாவசிய ஊட்டச்சத்துக்கள் மற்றும் தாதுக்கள் குறைவதில்லை என்பதை உறுதிப்படுத்த பல்வேறு வகையான உணவுகளை வழங்குவதே முக்கியம். இது உணவு ஜூன் எங்கள் மேல் 7 பிடித்தவை பட்டியலில் என்று அறியவும் Caridina மற்றும் Neocaridina இறால்.
1. ஹிகாரி இறால் உணவு
ஹிகாரி என்பது நீண்டகாலமாக மீன்வள பொழுதுபோக்கில் சிறந்த, சுவையான மீன் உணவுகளுக்கு பெயர் பெற்றது, மேலும் அவற்றின் இறால் உணவு வகைகளும் வேறுபட்டவை அல்ல. இந்த சிறிய மூழ்கும் துகள்கள் படிக மற்றும் செர்ரி இறால்களை இனப்பெருக்கம் செய்வதற்கு மிகச் சிறந்தவை, ஏனென்றால் அவை குழந்தைகள் மற்றும் பெரியவர்கள் இருவரும் சாப்பிடக் கூடியவை. (நீங்கள் ஒரு பெரிய துகள்களின் அளவை விரும்பினால், ஹிக்காரி நண்டு உணவு என்பது இறால், நத்தைகள், நண்டு மற்றும் நண்டுகளுக்கு மிகவும் ஒத்த உணவாகும்.)
இறால் உணவு என்பது ஒரு விரிவான இறால் உணவாகும், இது கடற்பாசி மற்றும் ஸ்பைருலினா ஆல்கா போன்ற காய்கறிப் பொருட்களையும், கிரில் போன்ற இயற்கை வண்ண மேம்பாட்டாளர்களையும் கொண்டுள்ளது. இது ஆரோக்கியமான உருகுதல் மற்றும் வளர்ச்சியை ஊக்குவிக்க கால்சியம் மற்றும் பிற வைட்டமின்களையும் வழங்குகிறது. இறால் உணவுகளில் உள்ள தாமிரம் அவற்றின் முதுகெலும்பில்லாதவர்களுக்கு தீங்கு விளைவிக்கும் என்று தொடக்க இறால் பராமரிப்பாளர்கள் பெரும்பாலும் அஞ்சுகிறார்கள், ஆனால் இறால் உணவு போன்ற பல இறால் உணவுகளில் இறால் ரத்தம் அல்லது ஹீமோசயினின் தயாரிக்க தேவையான தாமிரங்கள் உள்ளன.
2. எக்ஸ்ட்ரீம் இறால் மூழ்கும் குச்சிகள்
குழந்தைகளுக்கு ஒரு கடி கிடைக்குமா என்பதை உறுதிப்படுத்த பெரும்பாலான இறால் உணவுகள் சிறிய துகள்களாக விரைவாகக் கரைந்தாலும், மீன்வளையில் மிதக்கும் அதிகப்படியான ஊட்டச்சத்துக்கள் அனைத்தும் நீங்கள் கவனமாக இல்லாவிட்டால் மேகமூட்டம் மற்றும் ஆபத்தான நீர் தர சிக்கல்களுக்கு வழிவகுக்கும். நீங்கள் வயது வந்த இறால்களை ஒரு சமூக தொட்டியில் வைத்திருந்தால், லாபத்திற்காக இனப்பெருக்கம் செய்வதில் கவனம் செலுத்தவில்லை என்றால் , இறால் மூழ்கும் குச்சிகள் உங்கள் அமைப்பிற்கு சிறந்த தேர்வாக இருக்கலாம். இந்த 3 மிமீ குச்சிகள் நீண்ட காலமாக அவற்றின் வடிவத்தை நீருக்கடியில் வைத்திருக்கும்படி செய்யப்படுகின்றன, உங்கள் இறால்கள் அவற்றின் உணவு அடி மூலக்கூறுக்கு இடையிலான விரிசல்களில் உருகாமல் மேய்ச்சலுக்கு நிறைய நேரம் தருகின்றன. இந்த பிரதான இறால் உணவை ஒவ்வொரு நாளும் உணவளிக்க முடியும், ஏனெனில் அதில் தரமான பொருட்கள், கால்சியம் மற்றும் அதிக அளவு வைட்டமின்கள் உள்ளன.
3. செரா இறால் இயற்கை மூழ்கும் துகள்கள்
மீன் பொழுதுபோக்கில், நீர்வாழ் விலங்குகளின் அசல் சூழலையும் உணவையும் முடிந்தவரை நெருக்கமாக உருவகப்படுத்த முயற்சிக்கிறோம். அதனால்தான் செரா இறால் இயற்கை உணவுடன் சாயம் அல்லது பாதுகாப்புகள் இல்லாத இயற்கை பொருட்களின் கலவையைப் பயன்படுத்துகிறது. மூழ்கும் துகள்களில் உங்கள் இறால்களின் பிடித்தவைகளான ஸ்பைருலினா, ஸ்டிங் தொட்டால் எரிச்சலூட்டுகிற ஒருவகை செடி, ஆல்டர் கூம்புகள் மற்றும் மூலிகைகள் உள்ளன. உங்கள் இறால் காலனியின் வளர்ச்சி, வண்ணம் மற்றும் இனப்பெருக்கம் ஆகியவற்றை ஆரோக்கியமான பொருட்களால் அதிகரிக்கவும், அவை உங்கள் தண்ணீரை மாசுபடுத்தாது.
4. ஃப்ளூவல் பிழை இறால் ஃபார்முலாவை கடிக்கிறது
இறால் மற்றும் மீன் உணவில் உள்ள புரதங்கள் பொதுவாக மீன் மற்றும் ஓட்டுமீன்கள் ஆகியவற்றிலிருந்து வருகின்றன, ஆனால் பூச்சிகள் இறால் உணவில் இயற்கையாக நிகழும் பகுதியாகும் என்பதை மறந்துவிடாதீர்கள். ஃப்ளூவல் பிழை கடித்த இறால் ஃபார்முலாவில் நீடித்த பதப்படுத்தப்பட்ட கருப்பு சிப்பாய் ஈ லார்வாக்கள் உள்ளன, அவை ஊட்டச்சத்துக்கள் நிறைந்தவை மற்றும் கால்சியம் மற்றும் வைட்டமின் டி 3 உடன் பலப்படுத்தப்பட்ட வெளிப்புற எலும்புக்கூடுகளை மேம்படுத்துகின்றன. இந்த 0.25-1 மிமீ துகள்களில் ஆரோக்கியமான வளர்ச்சி மற்றும் எளிதான செரிமானத்திற்கான சால்மன், பச்சை பட்டாணி மற்றும் அல்பால்ஃபா போன்ற சுவையான பொருட்களும் அடங்கும்.
5. ஜெல் உணவை மறுபரிசீலனை செய்யுங்கள்
சிறிய வயிற்றைக் கொண்ட சிறிய தோட்டிகளாக, இறால் நாள் முழுவதும் தொடர்ந்து மேய்ச்சலை விரும்புகிறது. அதனால்தான் ரெபாஷி ஜெல் உணவு எங்கள் பட்டியலில் இடம் பெறுகிறது. வெதுவெதுப்பான நீரில் தூள் கலந்து வெறுமனே ஒரு சத்தான ஜெல் உணவை உருவாக்குகிறது, இது 24 மணி நேரம் வரை நீரில் நிலையானதாக இருக்கும், ஆனால் இறால் எளிதில் கடித்தால் போதும். குழந்தை இறால் சாப்பிடுவதற்கு நீங்கள் நேரடியாக தூளை தண்ணீர் நெடுவரிசையில் கூட உணவளிக்கலாம், ஏனெனில் புதிதாகப் பிறந்தவர்கள் நிறைய சுற்றி நீந்துவதில்லை, உணவு நேரத்தில் பெரியவர்களுடன் போட்டியிட முடியாது. ஸ்பைருலினா, பட்டாணி புரதம், அல்பால்ஃபா இலைகள் மற்றும் கடற்பாசி போன்ற ஆல்கா மற்றும் தாவரப் பொருட்களில் மறுபயன்பாட்டு மண்ணின் பசுமை அதிகம். ரெபாஷி கம்யூனிட்டி பிளஸ் என்பது கிரில், அல்பால்ஃபா , ஸ்க்விட் மற்றும் கடற்பாசி ஆகியவற்றைக் கொண்டு தயாரிக்கப்படும் ஒரு நல்ல சர்வவல்லமையுள்ள கலவையாகும். ஜெல் உணவை உருவாக்குவது எவ்வளவு எளிது என்பதை அறிய இந்த கட்டுரையைப் படியுங்கள் .
6. மிருகக்காட்சிசாலையின் நானோ விருந்து உணவுத் தொகுதிகள்
விடுமுறை உணவுத் தொகுதிகள் வழக்கமாக நீங்கள் ஒரு சிறப்பு மீன் உணவாக கருதப்படுகின்றன, நீங்கள் சிறிது நேரம் ஊருக்கு வெளியே சென்று செல்லப்பிராணி உட்காருபவரை வேலைக்கு எடுக்க விரும்பவில்லை என்றால் மட்டுமே நீங்கள் உணவளிக்கிறீர்கள். தண்ணீரை மேகமூட்டாமல் காலப்போக்கில் மெதுவாக உணவை வெளியிடுவதற்காக, அவை உண்மையில் அதிக அளவு கால்சியம் சல்பேட், மெக்னீசியம் சல்பேட் மற்றும் இறால் உருகுவதற்குத் தேவையான பிற தாதுப்பொருட்களைக் கொண்டுள்ளன. உங்கள் குழாய் நீர் மிகவும் மென்மையாகவும், தாதுக்கள் குறைவாகவும் இருந்தால் , அவற்றின் வழக்கமான உணவு சுழற்சியின் ஒரு பகுதியாக நானோ விருந்து உணவுத் தொகுதியில் கைவிடுவதைக் கவனியுங்கள் . உங்கள் இறால், நத்தைகள் மற்றும் மீன்கள் அனுபவிக்கும் சத்தான பிளாங்க்டன் மற்றும் ஸ்பைருலினா ஆகியவற்றால் தொகுதிகள் நிரம்பியுள்ளன.
7. காய்கறிகள்
பதிவு செய்யப்பட்ட அல்லது வெட்டப்பட்ட காய்கறிகள் உங்கள் இறால் உணவில் தாவர உள்ளடக்கத்தை அதிகரிக்க உதவும் எளிதில் கிடைக்கும் உணவு. சத்தான உள்ளடக்கம், மென்மையான அமைப்பு மற்றும் உடனடியாக மூழ்கும் திறன் ஆகியவற்றின் காரணமாக பதிவு செய்யப்பட்ட பச்சை பீன்ஸ் அவர்களுக்கு பிடித்த ஒன்று. பதிவு செய்யப்பட்ட துண்டுகளாக்கப்பட்ட கேரட் உணவளிக்க மற்றொரு பிரபலமான காய்கறி ஆகும், ஏனெனில் பீட்டா கரோட்டின் இயற்கையாகவே இறாலில் சிவப்பு-ஆரஞ்சு நிறத்தை மேம்படுத்துகிறது. சீமை சுரைக்காயின் துண்டுகளை வெட்டவும் முயற்சி செய்யலாம், இதனால் இறால் மேய்ச்சலுக்கு அவை மென்மையாக இருக்கும். தொட்டியை அதிகப்படியாகப் பயன்படுத்தாமல் கவனமாக இருங்கள், ஏனெனில் சாப்பிடாத காய்கறிகள் இறுதியில் வீழ்ச்சியடையும் மற்றும் தொட்டியில் சிதைவடைந்தால் நீர் தர சிக்கல்களை ஏற்படுத்தக்கூடும்.
போனஸ்: கட்டப்பா இலைகள்
இந்திய பாதாம் இலைகள் என்றும் அழைக்கப்படும் இந்த உலர்ந்த தாவரவியல் பெரும்பாலும் மீன்வளங்களில் பயன்படுத்தப்படுகிறது, ஏனெனில் அவை பழுப்பு நிற டானின்களை லேசான ஆண்டிபயாடிக் மற்றும் பூஞ்சை காளான் பண்புகளைக் கொண்ட நீரில் விடுகின்றன. இறால் வளர்ப்பவர்கள் அவர்களை நேசிக்கிறார்கள், ஏனெனில் இலைகள் பயோஃபில்மின் மெல்லிய அடுக்கை உடைக்கின்றன. இந்த பயோஃபில்மில் குழந்தை இறால்களுக்கு நாள் முழுவதும் மேய்ச்சலுக்கான சத்தான பாக்டீரியா, ஆல்கா மற்றும் பிற நுண்ணுயிரிகள் உள்ளன. 20 கேலன் தண்ணீருக்கு ஒரு இலையைச் சேர்த்து, பழைய இலை துளைகளை உருவாக்கத் தொடங்கியதும் புதிய இலையைச் சேர்க்க பரிந்துரைக்கிறோம். பழைய இலையை வெளியே எடுக்க வேண்டிய அவசியமில்லை, ஏனெனில் அது உங்கள் இறால் முழுவதுமாக விழுங்கும்.
எங்கள் அனுபவத்தில், பெரும்பாலான இறால்கள் அவ்வளவு சேகரிப்பதில்லை, மேலும் நீங்கள் மீன்வளத்திற்குள் இறக்கும் எந்த உணவையும் ஆவலுடன் சாப்பிடுவார்கள். இறால்களை வைத்திருத்தல், உணவளித்தல் மற்றும் இனப்பெருக்கம் செய்வது பற்றிய கூடுதல் தகவலுக்கு, நன்னீர் குள்ள இறால் பற்றிய எங்கள் கண்ணோட்டத்தைப் படியுங்கள்.
மீன்வளத்தை நிறுவுவதற்கு புதிய பொழுதுபோக்கு மீன் பராமரிப்பாளர்கள் தொடங்கி, அவர்களுக்கு முன் வந்தவர்களின் தவறுகளைப் படித்து, சில பொதுவான ஆபத்துக்களைத் தவிர்க்க வேண்டும்.
மிகச் சிறியதாகத் தொடங்குகிறது
மினி-மீன் தொகுப்புகள் கிடைப்பதால், சிறியதாக செல்ல இது ஈர்க்கக்கூடும். இருப்பினும், ஆரம்பநிலைக்கு, ஒரு சிறிய மீன்வளத்தைத் தேர்ந்தெடுப்பது தோல்வியைக் குறிக்கிறது. நீரின் அளவு சிறியதாக இருக்கும்போது, முக்கிய நீர் அளவுருக்கள் மிக விரைவாக மாறும் மற்றும் பிழைக்கு இடமளிக்காது.
அனுபவம் வாய்ந்த மீன்வளவாதிகள் கூட ஒரு சிறிய மீன்வளத்தால் சவால் செய்யப்படுகிறார்கள். பொழுதுபோக்கிற்கு புதியவர்கள் நீங்கள் அனுபவமடையும் வரை 20 கேலன் கீழ் தொட்டிகளிலிருந்து விலகி இருக்க வேண்டும். பெரிய தொட்டி, ஒரு தவறு மீனுக்கு குறைந்த தாக்கத்தை ஏற்படுத்தும்.
மீனை மிக விரைவில் சேர்ப்பது
புதிய மீன் உரிமையாளர்கள் மீன் சேர்க்க ஆர்வமாக உள்ளனர் , பெரும்பாலும் அவர்கள் தொட்டியை அமைத்த அதே நாளில். சிலர் அதிர்ஷ்டசாலிகள், ஆனால் பலர் தங்கள் மீன்களில் சிலவற்றை அல்லது அனைத்தையும் விரைவில் இழப்பார்கள். புதிய தொட்டியில் உள்ள நீர் நிலைப்படுத்தப்பட வேண்டும். வாயுக்கள் நீரில் கரைக்கப்படுவதோடு, தாதுக்கள், கன உலோகங்கள் மற்றும் உள்ளூர் நீர் சுத்திகரிப்பு நிலையங்களில் சேர்க்கப்படும் ரசாயனங்கள். தண்ணீரே மீன்களுக்கு தீங்கு விளைவிக்கும். தீங்கு விளைவிக்கும் பொருள்களை நடுநிலையாக்குவதற்கு மீன் நீரை நீர் கண்டிஷனருடன் சிகிச்சையளிக்க வேண்டும் மற்றும் கரைந்த வாயுக்கள் தப்பிக்க அனுமதிக்க ஒரு நாள் அல்லது அதற்கு மேல் நிற்க அனுமதிக்க வேண்டும், மேலும் பி.எச். வடிகட்டுதல் அமைப்பு செயல்படுவதையும், ஹீட்டர் தண்ணீரை சரியான வெப்பநிலைக்குக் கொண்டுவருவதையும், தொட்டி குறைந்தது ஒரு நாளாவது கசியவில்லை என்பதையும் உறுதிப்படுத்த விரும்புகிறீர்கள். பின்னர், மீன்வளத்திற்கு ஒரு சில மீன்களை அறிமுகப்படுத்துவது பாதுகாப்பாக இருக்கும்.
ஒரே நேரத்தில் பல மீன்களைச் சேர்ப்பது
மீன்களால் தொட்டியை நிரப்ப நீங்கள் ஆர்வமாக இருக்கலாம், ஆனால் துரதிர்ஷ்டவசமாக ஒரே நேரத்தில் பல மீன்களைச் சேர்ப்பது புதிய உரிமையாளர்களின் மற்றொரு பொதுவான தவறு. பயோ-வடிப்பானில் நன்மை பயக்கும் பாக்டீரியா காலனிகள் முழுமையாக நிறுவப்படும் வரை, மீன்வளமானது முழு சுமை மீன்களையும் பாதுகாப்பாக ஆதரிக்க முடியாது. ஆரம்பத்தில், சிறிய ஹார்டி மீன்களை மட்டும் சேர்க்கவும். அதிக மீன்களைச் சேர்ப்பதற்கு முன்பு அம்மோனியா மற்றும் நைட்ரைட் அளவு இரண்டும் உயர்ந்து பூஜ்ஜியமாகக் குறையும் வரை காத்திருங்கள். ஆரம்ப நைட்ரஜன் சுழற்சியின் வழியாக ஒரு புதிய மீன்வளம் செல்ல பொதுவாக 3-6 வாரங்கள் ஆகும், எனவே இந்த நேரத்தில் மீன் வாரத்திற்கு சிலவற்றை மட்டுமே சேர்க்க வேண்டும்.
மீன்வளத்தை மிகைப்படுத்துதல்
புதிய உரிமையாளர்கள் மீன்வளத்தை அதிகமாகப் பயன்படுத்துவது மிகவும் பொதுவானது. ஒரு அனுபவமுள்ள நபர் 20 சிறிய மீன்களைக் கொண்ட ஒரு பள்ளியை பத்து கேலன் மீன்வளையில் வெற்றிகரமாக வைத்திருக்கலாம் என்றாலும், ஒரு தொடக்கக்காரர் அதை முயற்சிப்பது பேரழிவு தரும்.
சரளை மற்றும் அலங்காரங்கள் அதில் இருந்தபின் உண்மையில் மீன்வளையில் வைக்கப்படும் நீரின் அளவு நிகர கேலன் தண்ணீராக இருக்க வேண்டும். மீன்வளத்தின் உண்மையான தண்ணீருக்கு தொட்டி அளவின் 80 சதவீத விகிதத்தைப் பயன்படுத்த விரும்புவீர்கள்.
எடுத்துக்காட்டாக, அலங்காரங்கள் மற்றும் சரளை சேர்க்கப்பட்ட பிறகு ஒரு “10-கேலன் மீன்” 8 கேலன் தண்ணீரை மட்டுமே வைத்திருக்கக்கூடும். ஒரு கேலன் நீர் விதிக்கு ஒரு அங்குல மீன் நீளத்தைப் பயன்படுத்தி, 8 அங்குல மீன்கள் பாதுகாப்பாக வைக்கப்பட வேண்டிய அதிகபட்ச எண்ணிக்கையாகும். அது முழு வளர்ச்சியடையும் போது ஒரு அங்குல நீளமாக வளரும் 8 மீன்களாகவோ அல்லது முழு வளரும்போது 2 அங்குல நீளமாக வளரும் 4 மீன்களாகவோ இருக்கலாம். அதிகபட்சத்தை விட அதிகபட்சமாக செல்வது எப்போதும் புத்திசாலித்தனம். இது ஒரு பொதுவான விதி மற்றும் பெரிய வடிகட்டுதல் அமைப்புகளைக் கொண்ட பெரிய மீன்வளங்கள் பெரும்பாலும் நீரின் தரம் சரியாக நிர்வகிக்கப்பட்டால் இதை விட அதிகமான மீன்களை வைத்திருக்க முடியும்.
பொருந்தாத மீன்களை வைத்திருத்தல்
புதிய மீன் உரிமையாளர்கள் பெரும்பாலும் சுற்றுச்சூழல் தேவைகளை அறியாமல் தங்களுக்கு ஈர்க்கக்கூடிய மீன்களை தேர்வு செய்கிறார்கள். சில மீன்கள் ஒருவருக்கொருவர் சண்டையிடலாம் அல்லது பரவலாக வேறுபட்ட நீர் நிலைமைகள் தேவைப்படலாம். தொட்டி துணையைத் தேர்ந்தெடுப்பதற்கு முன்பு ஒவ்வொரு இனத்தையும் எப்போதும் ஆராய்ச்சி செய்யுங்கள் . ஒத்த நீர் நிலைகளில் செழித்து வளரும் அமைதியான மீன்களைத் தேர்ந்தெடுக்கவும்.
உங்கள் மீனுக்கு அதிகப்படியான உணவு
மீன் உரிமையாளர்கள் செய்த முதல் தவறு மீன்களுக்கு அதிகப்படியான உணவு . மீன் சந்தர்ப்பவாதமானது மற்றும் எல்லா நேரங்களிலும் உணவைத் தேடும். அவர்கள் பசியுடன் தோன்றுவதால் அவர்களுக்கு எல்லா நேரமும் உணவளிக்க வேண்டும் என்று அர்த்தமல்ல. ஐந்து நிமிடங்களில் அவை முழுமையாக உட்கொள்வதை விட அவர்களுக்கு உணவளிக்க வேண்டாம். ஐந்து நிமிடங்களுக்குப் பிறகு உணவு மீதமுள்ளால், உணவை வலையுடன் அகற்றிவிட்டு, அடுத்த முறை குறைந்த உணவை உண்ணுங்கள்.
தொடக்கத்தின்போது, ஒரு நாளைக்கு ஒரு முறைக்கு மேல் மீன்களுக்கு உணவளிக்க வேண்டாம்; அம்மோனியா அல்லது நைட்ரைட் அளவு அதிகமாக இருக்கும் முக்கியமான காலங்களில், உற்பத்தி செய்யப்படும் கழிவுகளை குறைக்க ஒரு நாள் அல்லது இரண்டு நாட்களுக்கு உணவளிப்பதை நிறுத்துங்கள். மீன் எளிதில் உணவு இல்லாமல் பல நாட்கள் செல்லலாம் மற்றும் மோசமான விளைவுகளை சந்திக்காது. உங்கள் மீன் சுழற்சி மற்றும் அம்மோனியா மற்றும் நைட்ரைட் அளவு பூஜ்ஜியமாகிவிட்டால், உங்கள் மீன்களுக்கு தினமும் இரண்டு முறை உணவளிக்க ஆரம்பிக்கலாம்.
போதுமான வடிகட்டுதல்
வடிகட்டி வழியாக நீரின் ஓட்டம் தான் உங்கள் மீன்களுக்கு தண்ணீரைப் பாதுகாக்க வைக்கிறது. ஒரு மீன் வடிகட்டி தொட்டியில் உள்ள அனைத்து நீரையும் ஒரு மணி நேரத்திற்கு குறைந்தது மூன்று முறை கடந்து செல்ல வேண்டும். அது இல்லை என்றால், அது மிகவும் சிறியது. வடிகட்டி அளவு குறித்து சந்தேகம் இருந்தால், அடுத்த பெரிய அளவிற்கு செல்லுங்கள். நீங்கள் அதிகமாக வடிகட்ட முடியாது, ஆனால் நீங்கள் நிச்சயமாக வடிகட்டலாம், மேலும் முடிவுகள் உங்கள் மீன்களுக்கு தீங்கு விளைவிக்கும்.
புதிய உரிமையாளர்களுக்கு நைட்ரஜன் சுழற்சியைப் பற்றி முழு அறிவும் இல்லை அல்லது அவர்கள் மீன்வளையில் நீர் வேதியியலை சோதிக்க வேண்டும் என்று அவர்களுக்குத் தெரியாது. இதன் விளைவாக, ஒரு புதிய மீன்வளையில் தண்ணீரில் விரைவாகக் குவிந்துவரும் தீங்கு விளைவிக்கும் நச்சுக்களைச் சமாளிக்க அவர்கள் நடவடிக்கை எடுக்கத் தவறிவிடுவார்கள்.
தொட்டி முதலில் அமைக்கப்பட்டதும், அதை ஓரிரு நாட்கள் இயக்க அனுமதிக்கவும். மீனைச் சேர்ப்பதற்கு முன், ஒரு அடிப்படை பதிவுக்காக pH, கடினத்தன்மை, காரத்தன்மை, அம்மோனியா, நைட்ரைட் மற்றும் நைட்ரேட் அளவை சோதிக்கவும். தொடக்க சுழற்சியின் போது, அம்மோனியா மற்றும் நைட்ரைட்டை அடிக்கடி சோதிப்பது முக்கியம் ( விவரங்களுக்கு நைட்ரஜன் சுழற்சியைப் பார்க்கவும்). தொட்டி நன்கு நிறுவப்பட்டதும், கண்ணுக்குத் தெரியாத சிக்கல்களைக் கண்டுபிடிக்க மாதந்தோறும் தண்ணீரைச் சோதிக்கவும். மீன் திடீரென இறந்துவிட்டால், ஏதாவது மாறிவிட்டதா என்று தண்ணீரை சோதிக்கவும் .
தண்ணீரை மாற்றவில்லை
புதிய உரிமையாளர்கள் எப்போதுமே மீன்வள பராமரிப்பு பற்றி கல்வி கற்பதில்லை , இதில் நீரின் ஒரு பகுதியை வழக்கமான அடிப்படையில் மாற்றுவது அடங்கும். சரளைகளை வெற்றிடமாக்குவதன் மூலமும், சிறிது தண்ணீரை அகற்றி, புதிய தண்ணீரில் மாற்றுவதன் மூலமும் மட்டுமே அகற்றக்கூடிய தொட்டியில் கழிவுகள் உருவாகின்றன. பொதுவாக ஒரு புதிய மீன்வளையில் வாரந்தோறும் ஒரு பகுதி நீர் மாற்றம் செய்யப்படுகிறது, பின்னர் ஒரு மாதத்திற்கு ஒரு முறை உயிர் வடிகட்டி நிறுவப்பட்டதும். ஒவ்வொரு நீர் மாற்றத்திற்கும் சுமார் 20% தண்ணீரை அகற்றி மாற்றுவது பொதுவாக போதுமானது. உங்கள் மீன்களுக்கான நீர் தர சோதனை முடிவுகள் சரியான மட்டத்தில் இல்லாவிட்டால் அடிக்கடி நீர் மாற்றங்களைச் செய்யுங்கள். உங்கள் மீன்வளையில் சேர்ப்பதற்கு முன்பு தண்ணீரைத் தட்ட எப்போதும் டெக்ளோரினேட்டர் அல்லது வாட்டர் கண்டிஷனரைச் சேர்க்கவும்.
நீங்கள் பராமரிப்பு மற்றும் வழக்கமான நீர் மாற்றங்களில் தோல்வியுற்றால் உங்கள் மீன் இறக்காது என்றாலும், தரமற்ற நீர் நிலைகளால் அவை வலியுறுத்தப்படும். இதன் விளைவாக, அவர்கள் நோய்க்கு ஆளாக நேரிடும், மேலும் அவை இருக்க வேண்டியதை விட குறுகிய ஆயுட்காலம் இருக்கும்.
NEW EXOTIC FISH STOCK ALERT! #vedhafishfarm
“🔥 NEW EXOTIC FISHES JUST ARRIVED! 🔥”
🐠 NEW EXOTIC FISH STOCK ALERT! 🐠
Aquarium lovers, we’ve just upgraded our collection with more stunning exotic fishes! 🌈✨
From rare beauties to colorful community fish, fresh stock has arrived and is now available at Vedha Fish Farm. Don’t miss your chance to add these amazing fishes to your aquarium before they’re gone! 🔥
✅ Healthy & Active Fish
✅ Premium Quality Stock
✅ Aquarium Accessories Available
✅ Fish Foods & Medicines in Store
📍 Visit Vedha Fish Farm today or DM us for availability.
How to make your aquarium crystal clear #aquarium #VedhaFishFarm #AquariumCleaning
Welcome to Vedha Fish Farm! 🐠✨
In this video, I’ll show you how to make your aquarium crystal clear naturally and keep your fish tank water clean, healthy, and beautiful for a long time.
If your aquarium water looks cloudy, green, dirty, or has floating particles, this video will help you fix it step by step using simple methods. Perfect for beginners and fish lovers in India.
In this video you will learn:
✔️ How to clear cloudy aquarium water
✔️ Best aquarium filtration tips
✔️ How often to change aquarium water
✔️ Tips to remove bad smell from fish tank
✔️ How to maintain crystal clear water naturally
✔️ Common mistakes that make aquarium water dirty
✔️ Fish tank cleaning and maintenance tips
A clean aquarium not only looks amazing but also keeps your fish healthy and stress-free.
📌 Don’t forget to Like, Share & Subscribe to Vedha Fish Farm for more aquarium tips, fish care videos, DIY fish tank ideas, and fish breeding content.
How to Grow Aquarium Plants at Home 🌱 | Beginner to Pro Guide for Lush Aquascapes
Welcome to Vedha Fish Farm Official! 🌊🐠
Want to grow beautiful, healthy aquarium plants at home? 🌿 In this complete beginner-to-advanced guide, we show you how to grow aquarium plants easily, even if you’re just starting out!
Learn the secrets of thriving aquatic plants including lighting, substrate, fertilizers, CO2, and maintenance tips used by professionals. Whether you have a small fish tank or a large aquascape, this video will help you create a stunning underwater garden.
💡 What you’ll learn:
Best aquarium plants for beginners
How to set up planted tanks at home
Lighting, CO2 & fertilizer tips
How to avoid common mistakes
Easy maintenance hacks for healthy growth
Perfect for aquarium hobbyists, aquascaping lovers, and anyone who wants a natural, vibrant fish tank.
👉 Don’t forget to Like, Share & Subscribe for more aquarium tips!
#AquariumPlants #Aquascaping #FishTankSetup #PlantedTank #AquariumTips
💡 What you’ll find here:
Step-by-step tutorials
Expert advice on fishkeeping
Stunning aquascape inspirations
Product reviews & recommendations
Behind-the-scenes of maintaining vibrant tanks
Subscribe to join our community of passionate aquarists and let’s explore the wonders of the aquatic world together! 🌿🌟
About Vedha Fish Farm:
Welcome to Vedha Fish Farm, your trusted destination for everything freshwater aquatics since 2012!
Founded with a passion for freshwater ecosystems and a dedication to excellence, Vedha Fish Farm has been bringing the beauty of aquatic life into homes, offices, and businesses for over a decade. From hobbyists just starting out to experienced aquarists, we’re here to help every step of the way.
மீன் வளர்ப்பில் இந்த தவறை மட்டும் செய்யாதீங்க | Vedha fish farm
Welcome to Vedha Fish Farm Official! 🌊🐠
Dive into the mesmerizing world of aquariums! 🐟💧 From aquascaping tips and fish care guides to tank setups and exotic aquatic species, we’re here to bring your underwater dreams to life. Whether you’re a beginner or a seasoned aquarist, our channel offers something for everyone who loves the beauty of aquatic life.
#AquariumLife | #FishTankGoals | #FreshwaterAquarium | #SaltwaterAquarium | #Aquascaping | #FishTankSetup | #AquariumLovers | #UnderwaterWorld | #TropicalFish | #AquariumHobby | #PlantedAquarium | #AquariumDesign | #AquariumInspiration | #AquariumVibes | #ReefTank | #BettaFish | #AquariumTips | #FishKeeping | #FishTankIdeas | #NanoAquarium | #AquaticPlants | #AquariumMaintenance | #Tankmates | #DIYAquarium | #AquariumTour | #AquariumAddict | #FishTankBuild | #AquariumDecor | #AquariumCommunity | #FishKeepingTips | #AquariumGoals | #AquariumSetup | #AquariumArt | #AquariumJourney | #FishTankLove | #AquariumCare | #CichlidTank | #MarineAquarium | #AquariumChannel | #ShrimpTank | #AquariumFishCare | #AquariumPhotography | #PlantedTankAddict | #ReefTankAddict | #AquascapeInspiration | #AquariumTutorial | #TankBuildJourney | #AquariumLifestyle | #AquariumIdeas | #AquariumAdventure
💡 What you’ll find here:
Step-by-step tutorials
Expert advice on fishkeeping
Stunning aquascape inspirations
Product reviews & recommendations
Behind-the-scenes of maintaining vibrant tanks
Subscribe to join our community of passionate aquarists and let’s explore the wonders of the aquatic world together! 🌿🌟
About Vedha Fish Farm:
Welcome to Vedha Fish Farm, your trusted destination for everything freshwater aquatics since 2012!
Founded with a passion for freshwater ecosystems and a dedication to excellence, Vedha Fish Farm has been bringing the beauty of aquatic life into homes, offices, and businesses for over a decade. From hobbyists just starting out to experienced aquarists, we’re here to help every step of the way.
At Vedha Fish Farm, we specialize in providing:
A wide variety of healthy and vibrant freshwater fish.
Premium quality aquatic plants to enhance your tank’s ecosystem.
Expertly curated equipment and supplies for every level of enthusiast.
Personalized guidance to help your aquarium flourish.
Our mission is to inspire and support the joy of freshwater aquariums while promoting sustainable and ethical aquaculture practices. With a team of experienced professionals and a deep love for aquatic life, we’re committed to helping you create a thriving, serene underwater world.
Thank you for choosing Vedha Fish Farm as your freshwater aquarium partner since 2012. Dive into the world of aquatics with us and experience the beauty of nature at its finest!


:max_bytes(150000):strip_icc():format(webp)/common-new-aquarium-mistakes-1380712_FINAL-5c769a8146e0fb0001a982ca.png)