தங்க மீன்கள் அழகானவை, மீன் வைத்திருக்கும் பொழுதுபோக்கில் மிகவும் பிரியமான உயிரினங்கள், ஆனால் சில நேரங்களில் அவற்றின் மீன்வளங்களில் ஒரு சிறிய வகையைச் சேர்ப்பது நன்றாக இருக்கும். தங்கமீன் சொந்தமாக பல வருடங்களுக்குப் பிறகு, தங்கமீன் தொட்டித் தோழர்களை வைத்திருப்பதற்கான எங்கள் சிறந்த உதவிக்குறிப்புகள் மற்றும் பரிந்துரைகளின் பட்டியலை நாங்கள் தொகுத்துள்ளோம் (நீங்கள் இதற்கு முன்பு கருத்தில் கொள்ளாத சிலவற்றை உள்ளடக்கியது).
என்ன வகையான மீனை நீங்கள் தங்க மீனுடன் வைத்திருக்க முடியும்?
நீங்கள் எப்போதாவது ஒரு குளிர் மீனைப் பார்த்திருந்தால், அது உங்கள் தங்கமீனுடன் நன்றாகப் போகுமா என்று யோசித்திருந்தால், பின்பற்ற வேண்டிய சில பொதுவான வழிகாட்டுதல்கள் இங்கே:
உங்கள் தங்கமீன் மீது எடுக்கும் ஆக்கிரமிப்பு மீன்களைத் தவிர்க்கவும். பொதுவாக, தங்கமீன்கள் அமைதியான விலங்குகள், அவை ஆக்கிரமிப்பு பார்ப்கள், ஆப்பிரிக்க சிச்லிட்கள் மற்றும் பிற பெரிய சிச்லிட்களுடன் செழிக்காது.
உங்கள் தங்கமீன் எவ்வளவு வேகமாக இருக்கிறது என்பதைக் கவனியுங்கள். பொதுவான தங்கமீன்கள் (ஒற்றை வால் அல்லது வால்மீன் தங்கமீன் என்றும் அழைக்கப்படுகின்றன) மிக வேகமாக நீச்சலடிப்பவர்கள் மற்றும் அவர்கள் செய்யக்கூடாத விஷயங்களை விழுங்குவதற்கான அதிக வாய்ப்பு உள்ளது. ஆடம்பரமான தங்கமீன்கள் மிகவும் மெதுவானவை, எனவே மற்ற மீன்களால் கொடுமைப்படுத்தப்படுவதற்கான அதிக வாய்ப்பு உள்ளது.
சிறிய மற்றும் ஸ்பைனி மீன்களிலிருந்து விலகி இருங்கள். தங்க மீன்கள் உணவு, அடி மூலக்கூறு, தாவரங்கள் மற்றும் பிற மீன்கள் உட்பட அனைத்தையும் ஆராய்ந்து தங்கள் வாயில் வைக்க விரும்புகின்றன. பெரும்பாலும், வாயில் பொருந்தும் அளவுக்கு சிறியதாக இருக்கும் எந்தவொரு உயிரினத்தையும் தவிர்க்க விரும்புகிறோம், எனவே தொட்டி துணையைத் தேர்ந்தெடுக்கும்போது முழு வளர்ந்த தங்கமீனின் அதிகபட்ச அளவைக் கவனியுங்கள். மேலும், ஓட்டோசின்க்ளஸ் அல்லது கோரி கேட்ஃபிஷ் போன்ற முதுகெலும்புகளைக் கொண்ட சிறிய மீன்களைப் பாருங்கள், அவை விழுங்கினால் தங்கமீனின் கில் தட்டில் சிக்கிக்கொள்ளக்கூடும்.
தங்கமீன்கள் போன்ற நிலைமைகளில் வாழக்கூடிய தொட்டி தோழர்களை வைத்திருங்கள். தங்கமீன்கள் முக்கியமாக 50-70 ° F இலிருந்து குளிரான வெப்பநிலையை விரும்புகின்றன, மேலும் ஹீட்டர் இல்லாமல் அறை வெப்பநிலையில் வாழலாம். எங்கள் பட்டியலில் உள்ள பல மீன்களுக்கு, இந்த சூழல் அவற்றின் வசதியான வெப்பநிலை வரம்பின் கீழ் முனையில் உள்ளது. மேலும், தொட்டி தோழர்கள் தங்க மீன்களை நோக்கிய ஒரு உணவை விட்டு வாழ முடியும். மாமிச உணவு தேவைப்படும் ஹார்ட்கோர் வேட்டையாடலை நீங்கள் சேர்த்தால், தங்கமீன்கள் அதிக புரதத்தைப் பெற்று மலச்சிக்கலாக மாறும் வாய்ப்பு உள்ளது.
இந்த தரை விதிகளை மனதில் கொண்டு, நாங்கள் தனிப்பட்ட முறையில் சோதித்த மற்றும் தங்கமீனுடன் இணக்கமாக இருப்பதைக் கண்டறிந்த எங்கள் முதல் 10 தொட்டி தோழர்கள் இங்கே:
1. Hillstream Loach
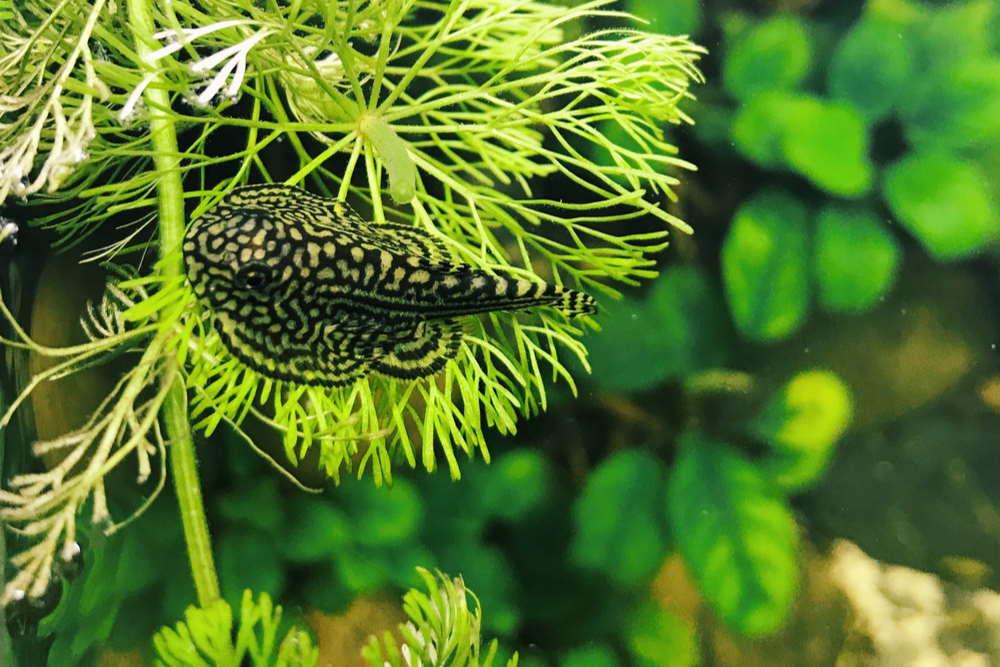
இந்த அற்புதமான ஒற்றைப்பந்து மீன் ஒரு மினியேச்சர் ஸ்டிங்ரே போல தோற்றமளிக்கிறது மற்றும் பிளெகோஸ்டோமஸ் (அல்லது பிளெகோ) போல செயல்படுகிறது. இது ஆல்காவைச் சாப்பிடுகிறது, உணவு ஸ்கிராப்புகளுக்கான தோட்டங்கள் மற்றும் கண்ணாடி மீது பிடிக்கிறது, அதனால் தங்கமீன்கள் அவற்றைப் பறிக்க முடியாது. எல்லாவற்றிற்கும் மேலாக, தங்கமீன்களைப் போலவே அவை குளிரான வெப்பநிலையையும் அனுபவிக்கின்றன. இந்த வகை மீன்களில் ரெட்டிகுலேட்டட் ஹில்ஸ்ட்ரீம் லோச், போர்னியோ சக்கர் லோச், சீன பட்டாம்பூச்சி லோச் மற்றும் பல தட்டையான உடல் லோச்சுகள் உள்ளன.
2. Brochis multiradiatus

கோரி கேட்ஃபிஷ் பொதுவாக தங்கமீன் தொட்டிகளுக்கு நல்ல யோசனையல்ல, ஏனென்றால் அவை தங்கமீனின் வாயில் பொருந்தும் அளவுக்கு சிறியவை, மேலும் அவற்றின் துடுப்புகளில் முதுகெலும்புகள் உள்ளன. ஆனால் நீங்கள் ஒரு பெரிய கோரிடோராஸைப் பெற முடிந்தால் என்ன செய்வது? பன்றி மூக்கு பூனைமீன் அல்லது கோரிடோராஸ் மல்டிராடியேட்டஸ் என்றும் அழைக்கப்படும் ப்ரோச்சிஸ் மல்டிராடியேட்டஸை உள்ளிடவும். இந்த கீழ்த்தரமான குடியிருப்பாளர் 4 அங்குல அளவு வரை அடையும் ஒரு வளர்ந்த கோரி கேட்ஃபிஷ் போல் தெரிகிறது. அவர்கள் சிறந்த தூய்மைப்படுத்தும் குழு உறுப்பினர்களாக பணியாற்றுகிறார்கள், ஏனெனில் அவர்கள் அடி மூலக்கூறு வழியாக தோண்டி, எஞ்சியவற்றை வெற்றிடமாக்குகிறார்கள். ஆமாம், அவற்றின் பெக்டோரல் மற்றும் டார்சல் ஃபின்களிலும் முதுகெலும்புகள் உள்ளன, ஆனால் அவை தங்கமீன்கள் உணவாகக் காண முடியாத அளவுக்கு பெரிதாக இருப்பதால் அவை ஒரு பிரச்சினையாக நாங்கள் காணவில்லை.
3. Dojo Loach

டோஜோ லோச்ச்கள் (அல்லது வானிலை சுழற்சிகள்) துடுப்புகளைக் கொண்ட கால் நீள ஹாட் டாக் போன்றவை, அவை நீந்தவும், சரளைகளில் புதைக்கவும், நீங்கள் எறிந்த எதையும் சாப்பிடவும் விரும்புகின்றன. இந்த நட்பு உயிரினங்கள் குளிர்ந்த நீரில் செழித்து வளர்கின்றன மற்றும் பல தங்கமீன் தொட்டிகளுக்கு பிரபலமான கூடுதலாகும். அவற்றின் பெரிய அளவு இருந்தபோதிலும், சாதாரண பதிப்பிற்கு Rs.350 மற்றும் குறைந்த விலை தங்கம் அல்லது அல்பினோ பதிப்புகளுக்கு Rs.700 அல்லது அதற்கு மேற்பட்ட விலையில் அவற்றைக் காணலாம். தங்க மீன்களுக்காக முயற்சித்த மற்றும் உண்மையான தொட்டி துணையை நீங்கள் தேடுகிறீர்களானால், டோஜோ ரொட்டியை நீங்கள் தவறாகப் புரிந்து கொள்ள முடியாது.
4. பிரிஸ்ட்லெனோஸ் பிளெகோ
ஆன்லைனில் சிலர் தங்கமீனின் மெல்லிய கோட் மீது சக் செய்யலாம் என்று சிலர் சொல்வதால், இந்த தேர்வு கொஞ்சம் சர்ச்சைக்குரியதாக கருதப்படலாம். நடைமுறையில், இது போதுமான உணவைப் பெறாத பெரிய பிளேகோக்களுடன் அதிகம் நிகழ்கிறது என்பதைக் காண்கிறோம் (ஏனென்றால் தங்கமீன்கள் எல்லாவற்றையும் கவரும்.) நீங்கள் ப்ரிஸ்ட்லெனோஸ் பிளெகோ போன்ற ஒரு சிறிய இனத்தை வைத்திருந்தால், அவற்றை நன்கு உணவாகவும், மெல்லிய பூச்சுகளிலிருந்து விலக்கி வைப்பதும் மிகவும் எளிதானது. ஆல்கா, சறுக்கல் மரம் மற்றும் அடி மூலக்கூறில் மறைத்து வைக்கப்பட்டுள்ள மோர்சல்கள் ஆகியவற்றில் அவை அடிக்கடி முனகுவதை நீங்கள் காணலாம். எவ்வாறாயினும், விளக்குகள் வெளியேறும் வரை தங்கமீன்கள் அமைதி அடையும் வரை எங்கள் சார்பு உதவிக்குறிப்பு காத்திருக்கிறது, பின்னர் இலக்கு பிளேகோவுக்கு மூழ்கும் செதில்கள் , ரத்தப்புழுக்கள் , உப்பு இறால் மற்றும் ரெபாஷி ஜெல் உணவு ஆகியவற்றின் நல்ல உணவை அளிக்கும் .

5. ரப்பர்நோஸ் பிளெகோ
ரப்பர் லிப் அல்லது புல்டாக் பிளெகோ என்றும் அழைக்கப்படும் இந்த பிளெகோஸ்டோம்கள் பிரிஸ்ட்லெனோஸ் பிளெக்கோஸுடன் மிகவும் ஒத்தவை, தவிர அவற்றின் முனகல்களில் எந்தவிதமான முட்கள் இல்லை. அவை ஒரே குணாதிசயங்கள் மற்றும் பராமரிப்புத் தேவைகளைக் கொண்டுள்ளன, மேலும் அவை 5 முதல் 6 அங்குல நீளத்திற்கு ஒரே அளவு வரை வளரும். அவர்களில் பெரும்பாலோர் முகத்தில் புள்ளிகள் அல்லது அவர்களின் முழு உடலையும் மூடி, பொதுவாக செல்ல கடை சங்கிலிகளில் விற்கப்படுகிறார்கள். “முக முடி” இல்லாத ப்ளெக்கோவை நீங்கள் தேடுகிறீர்களானால், இந்த அமைதியான ஆல்கா-தின்னை முயற்சிக்கவும்.
6. வெள்ளை மேக மலை மின்னோஸ்
நீங்கள் ஆடம்பரமான தங்கமீன்களை மட்டுமே வைத்திருந்தால், குளிர்ந்த நீர் மின்னாக்கள் ஒரு நல்ல தேர்வாக இருக்கலாம். அவை மிகவும் மலிவானவை, ஒன்றாக பள்ளிக்குச் செல்கின்றன, மேலும் 1.5 முதல் 2 அங்குல நீளம் வரை மட்டுமே வளரும். நீங்கள் முதலில் அவற்றை வாங்கும்போது, அவை மிகச் சிறியதாக இருக்கும், எனவே அவற்றை தங்கமீன் தொட்டியில் சேர்ப்பதற்கு முன்பு அவற்றை வளர்ப்பதை (மற்றும் அவற்றை வளர்ப்பதையும் கூட) கருதுங்கள். ஆமாம், இந்த மீன்கள் தங்கமீன் வாயில் பொருந்தக்கூடும், ஆனால் அவை மெதுவான ஆடம்பரமான தங்கமீனுடன் ஒப்பிடும்போது மிக வேகமாகவும் வேகமாகவும் இருக்கின்றன, அவற்றைப் பிடிப்பது கடினம். (ஒருவர் தற்செயலாக சாப்பிட்டால், அது தங்கமீனுக்கு தீங்கு விளைவிப்பதில்லை.)
பல வகையான வெள்ளை மேக மின்னாக்கள் (சாதாரண அல்லது தங்க வகைகள் போன்றவை) உள்ளன, ஆனால் லாங்ஃபின் வகைகளைப் பெறாதீர்கள், ஏனெனில் அவற்றின் நீட்டிக்கப்பட்ட துடுப்புகள் அவற்றைக் குறைத்து பிடிபடுவதற்கான வாய்ப்புகளை அதிகரிக்கும். அவற்றை முயற்சித்துப் பாருங்கள், ஏனென்றால் அவை மீன்வளத்திற்கு சுவாரஸ்யமான செயல்பாட்டைச் சேர்க்கின்றன, மேலும் தங்க மீன்களைப் பார்க்கவும் துரத்தவும் சிறந்த செறிவூட்டலை வழங்குகின்றன.

வெள்ளை மேக மலை மின்னோ
7. ரைஸ்ஃபிஷ்
வெள்ளை மேக மினோவின் அதே நரம்பில் அற்புதமான அரிசி மீன்கள் உள்ளன. இந்த குளிர்ந்த நீர் குடும்பத்தில் பிளாட்டினம் வெள்ளை, ஆரஞ்சு மற்றும் நீலம் போன்ற பல இனங்கள் மற்றும் வண்ண வகைகள் உள்ளன. ஒவ்வொன்றும் $ 5 முதல் $ 10 வரை, அவை வெள்ளை மேகங்களைப் போல மலிவானவை அல்ல, ஆனால் அவை எளிதில் இனப்பெருக்கம் செய்கின்றன, மேலும் இந்த பட்டியலில் உள்ள பல மீன்களுக்கு ஒரு அழகான பாராட்டு. அவை மீன்வளையில் உற்பத்தி செய்யப்படும் ஒட்டுமொத்த பயோலோட் (அல்லது கழிவு சுமை) உடன் சேர்க்கப்படும் என்பதை நினைவில் கொள்ளுங்கள், எனவே தங்கமீன்கள் மற்றும் நீங்கள் சேர்க்க விரும்பும் எந்த தொட்டி தோழர்களுக்கும் போதுமான தொட்டி இடம் உங்களிடம் உள்ளது என்பதை உறுதிப்படுத்திக் கொள்ளுங்கள்.

டெய்சியின் ரைஸ்ஃபிஷ்
8. ஹாப்லோ கேட்ஃபிஷ்
இந்த ஸ்பைனி ஆனால் மென்மையான கேட்ஃபிஷ் 5 அல்லது 6 அங்குல நீளத்திற்கு வளரும் ஒரு சூப்பர்சைஸ் செய்யப்பட்ட ஓடோசின்க்ளஸ் போல் தெரிகிறது. கொடி வால் ஹாப்லோ ( டயானெமா யூரோஸ்ட்ரியாட்டம் ), ஸ்பாட் ஹாப்லோ ( மெகாலெச்சிஸ் தோராகட்டா ), மற்றும் டெயில் பார் ஹாப்லோ ( மெகாலெச்சிஸ் பிக்டா ) ஆகியவை பல்வேறு இனங்கள் . ஹாப்லோ கேட்ஃபிஷ் நீண்ட விஸ்கர்களைக் கொண்டுள்ளது, அவை தொடர்ந்து உணவுக்காகத் துடைக்க உதவுகின்றன. இரவு நேர ப்ரிஸ்ட்லெனோஸ் மற்றும் ரப்பர்நோஸ் பிளெகோஸைப் போலல்லாமல், ஹாப்லோக்கள் பகல் நேரத்தில் சாப்பிடுகின்றன, எனவே அவர்களுக்கு போதுமான ஊட்டச்சத்து கிடைப்பதை உறுதிசெய்ய அவர்களுக்கு உணவளிப்பதை இலக்காகக் கொள்ள வேண்டிய அவசியமில்லை.

ஹாப்லோ கேட்ஃபிஷ்
9. மாறுபாடு பிளாட்டி
ஒரு லைவ் பியர் (அல்லது இளம் வயதினரைப் பெற்றெடுக்கும் மீன்) ஒரு தங்கமீன் தொட்டி துணையாக ஒற்றைப்படை தேர்வாகத் தோன்றலாம், ஆனால் கடந்த காலங்களில் இந்த போட்டியை நாங்கள் பலமுறை அனுபவித்திருக்கிறோம். பிளாட்டி மீன்களின் இரண்டு இனங்களில், வேரியாட்டஸ் பிளாட்டி ( ஜிஃபோபோரஸ் மாறுபாடு ) குளிர்ந்த நீரில் வாழலாம். சிலர் பல குழந்தைகளைப் பெற்றெடுக்க முடியும் என்பதால் லைவ் பியர்களை விரும்புவதில்லை, ஆனால் இந்த விஷயத்தில், உங்கள் தங்கமீன்கள் மகிழ்ச்சியுடன் பெரும்பாலான வறுக்கவும் சாப்பிட்டு மக்கள் தொகையை கட்டுக்குள் வைத்திருக்கும்.
பிளாட்டீஸ் பல வண்ணங்கள் மற்றும் வடிவங்களில் வருகின்றன, எனவே உங்கள் சிவப்பு, வெள்ளை மற்றும் ஆரஞ்சு தங்கமீன்களை வேறுபடுத்துவதற்கு நீங்கள் ஏதாவது தேடுகிறீர்களானால், நீல அல்லது மஞ்சள் பிளாட்டிகளின் பள்ளி தந்திரத்தை செய்யக்கூடும். இறுதியாக, அவர்கள் அருமையான தூய்மைப்படுத்தும் குழு உறுப்பினர்களாக பணியாற்றுகிறார்கள், தொடர்ந்து ஆல்கா அல்லது தொட்டியில் மறைத்து வைக்கப்பட்டுள்ள அதிகப்படியான உணவைத் தேர்ந்தெடுப்பார்கள்.

உலோக நீல பிளாட்டி
10. லாங்ஃபின் ரோஸி பார்ப்ஸ்
கட்டுரையின் ஆரம்பத்தில், அரை-ஆக்கிரமிப்பு மற்றும் ஆக்கிரமிப்பு பார்ப்களிலிருந்து விலகி இருக்க நாங்கள் பரிந்துரைத்தோம், இது ஒரு அவமானம், ஏனென்றால் பல பார்ப்கள் குளிர்ந்த நீரில் வாழ முடியும். அதிர்ஷ்டவசமாக, நீங்கள் சில எளிய விதிகளைப் பின்பற்றும் வரை, உங்கள் தங்கமீனுடன் இணைந்து வாழக்கூடிய ரோஸி பார்ப்ஸ் போன்ற ஒப்பீட்டளவில் அமைதியான பார்ப்கள் உள்ளன.
உதவிக்குறிப்பு # 1 எந்தவொரு கொடுமைப்படுத்துதலையும் குறைக்க ரோஸி பார்ப்களின் பெரிய பள்ளியைப் பெறுவது. உங்களிடம் 10 அல்லது அதற்கு மேற்பட்ட குழு இருந்தால் (ஆண்களை விட ஆண்களுடன் அதிகமான பெண்கள் அதிக ஆக்ரோஷமாக இருப்பதால்), அவர்கள் தங்களை மகிழ்வித்துக்கொள்வதோடு, உங்கள் மற்ற மீன்களையும் தனியாக விட்டுவிடுவார்கள். உதவிக்குறிப்பு # 2 என்பது நீண்ட காலமாக முடிக்கப்பட்ட பல்வேறு ரோஸி பார்ப்களைக் கண்டுபிடிப்பதாகும். பாயும் ஃபைனேஜ் இந்த வேகமான நீச்சல் வீரரை மெதுவாக்கும், இதனால் தங்க மீன்களுக்கு உணவு நேரங்களில் நியாயமான உணவு கிடைக்கும். உதவிக்குறிப்பு # 3 என்பது ஒற்றை வால் கொண்ட, பொதுவான தங்கமீன்கள் கொண்ட ரோஸி பார்ப்களை வைத்திருப்பதுதான், ஏனெனில் உங்கள் ஆடம்பரமான தங்கமீன் விருப்பத்திற்கு பார்ப்கள் இன்னும் வேகமாக இருக்கலாம்.
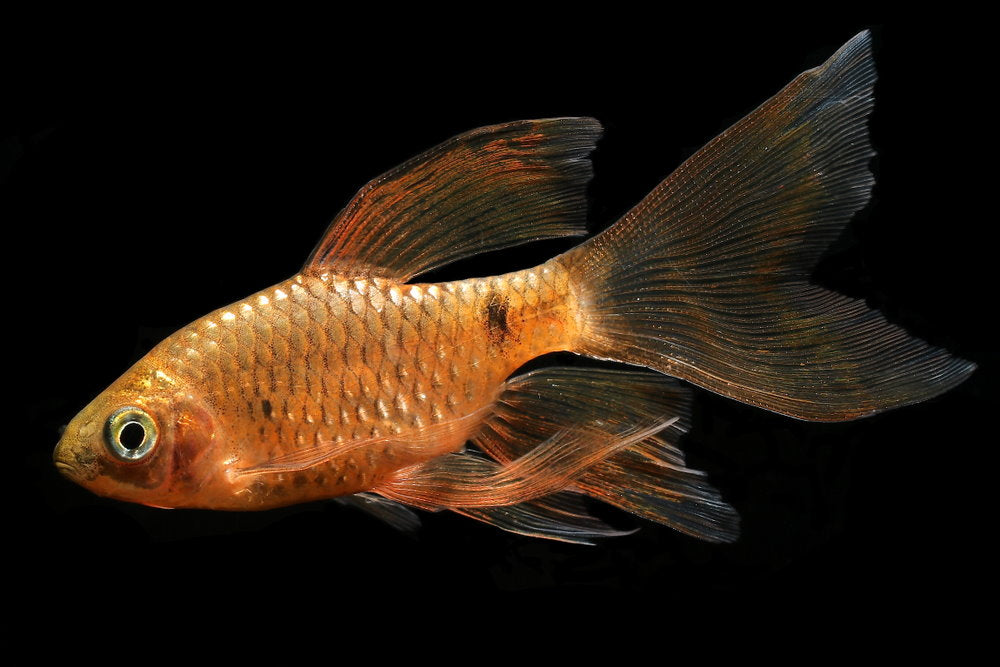
லாங்ஃபின் ரோஸி பார்ப்
நாங்கள் வகுத்துள்ள வழிகாட்டுதல்களையும் எடுத்துக்காட்டுகளையும் பின்பற்றுவதன் மூலம், தங்கமீனுடன் வைத்திருக்க பல தொட்டி தோழர்களை நீங்கள் கண்டறியலாம். தொட்டி துணையின் வெப்பநிலை, உணவு, பி.எச், ஆக்கிரமிப்பு மற்றும் அளவு ஆகியவற்றைக் கவனியுங்கள். எல்லா சரியான அளவுகோல்களுக்கும் பொருந்தக்கூடிய ஒரு இனத்தை நீங்கள் கண்டால், அது உங்கள் தங்கமீன் மீன்வளத்தின் அடுத்த சரியான ரூம்மேட் ஆக இருக்கலாம்!
ஆடம்பரமான தங்கமீன்கள் பற்றிய கூடுதல் தகவலுக்கு, அவர்கள் விரும்பிய வாழ்க்கை நிலைமைகள் மற்றும் சாப்பிட பிடித்த உணவுகளை உள்ளடக்கிய எங்கள் முழு பராமரிப்பு வழிகாட்டியைப் பார்க்கவும்.